Video Capture settings for Quicktime based Capture (Legacy)
QuickTime based capture will be removed in a future version of VideoLinkwell.
Know Issues with QuickTime based capture
The FaceTime HD camera in MacBook Pro Retina Late 2013 and Mac Book Pro Retina Mid 2014 is not compatible with VideoLinkwell although external USB and FireWire cameras will work.
Audio settings dialog has changed and can no longer set the speaker volume or the audio source. See Setting up VideoLinkwell Recording for more details
The Capture Preview Window sometimes does not show the video preview image. For and explanation of how to work around this issue to resolve it see Turning on VideoLinkwell Recording for details.
You should not use QuickTime based capture in new projects. It is however still an option in the current version for use with legacy projects during the transition to the new AVFoundation based capture.
This section explains how to configure QuickTime based capture.
Open VideoLinkwell Capture settings
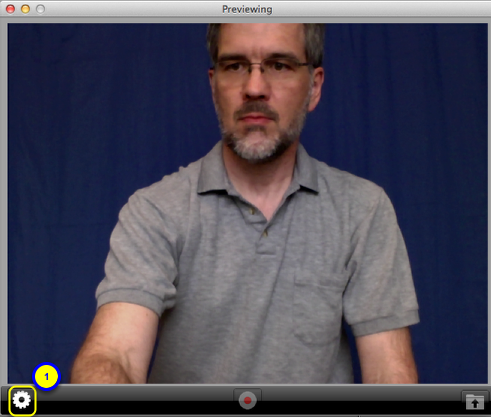
To open the VideoLinkwell Capture Settings
1.click on the Settings button in the capture window.
Open Video Settings
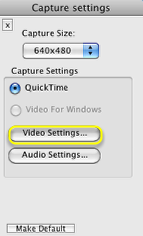
To set the Video Source, the type of compression and make adjustments to the video image click on the Video Settings... button.
THE VIDEO AND AUDIO SETTINGS DIALOG WILL CHANGE IN THE NEXT VERSION.
Video Settings - Video Source
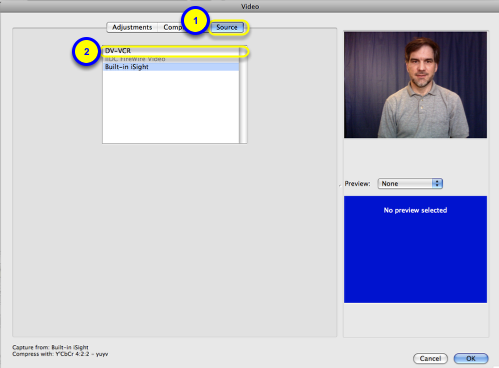
If you have more than one video source for example the built in iSight camera in your Mac and a DV camera then you must select the source for recording.
1. Click the Source tab.
2. Click on the video source you want to use
(in this example the current source is the Built-in iSight camera so you would click on the DV-VCR option to use a DV camera which is attached by Firewire.)
If you have a USB camera that is compatible it will be listed here so you can select that source.
3. Click the OK button.

4. Click the Make Default button to save the new video setting.
NOTE: If you don't click the Make Default button the settings will apply while the Capture Window is open but will revert to default the next time it is open.
Video Settings - Compression type

1. Open the Compression pane of the window by clicking on the Compression tab.
2. Click on the Compression Type button to show the compression options available.

3. Select the H.264 compression type from the list.
(This is necessary to ensure VideoLinkwell can use the video.)
4. Select the quality level.
5. Click the OK button.

4. Click the Make Default button to save the new video setting.
NOTE: If you don't click the Make Default button the settings will apply while the Capture Window is open but will revert to default the next time it is open.
If you change the Video Source you should change the Audio source as well to the same device to ensure the best audio recording.
Open Audio Settings
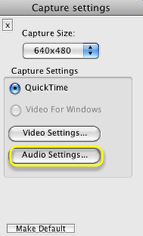
To set the Audio Source, the type of compression the sample rate and set the volume of the speaker or audio gain click on the Audio Settings... button.
THESE AUDIO SETTINGS ARE NO LONGER AVAILABLE IN VERSION 3.0.3B193.
THIS FEATURE WILL BE CHANGED IN THE NEXT VERSION.
TO CHANGE THESE SETTINGS YOU NEED TO OPEN AN EARLIER VERSION OF VIDEOLINKWELL 3.0 AND CHANGE THE SETTINGS AS DESCRIBED BELOW. WHEN YOU OPEN VIDEOLINKWELL 3.0.3B193 IT WILL USE THE NEW SETTINGS.
Audio Settings - Speaker off
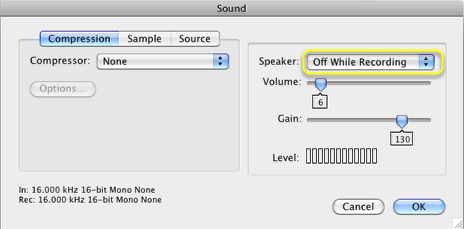
To prevent audio feedback while previewing your video you should set the speaker to Off in the Audio settings dialog.
(If the setting of the Speaker is Off While Recording or On the sound picked up by the microphone will be played back through the speakers which may cause loud audio feedback.)
1. Click the Speaker menu button.
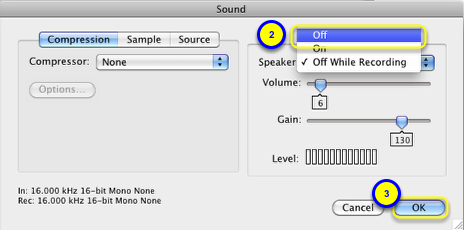
2. Select Off from the Speaker menu button.
3. Click the OK button.
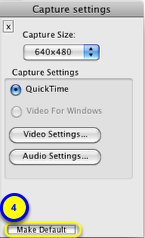
4. Click the Make Default button to save the new audio setting.
NOTE: If you don't click the Make Default button the settings will apply while the Capture Window is open but will revert to default the next time it is open.
Audio Settings - Audio Source
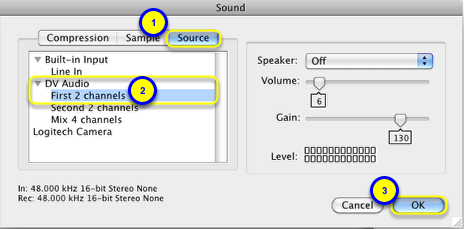
To set the audio source.
1. Click the Source tab.
2. Click on the audio source you want to use
(in this example you would click on the DV-Audio - First 2 channels option to use the internal microphone of a DV camera which is attached by a Firewire cable.)
-If were using a USB camera such as the Logitech camera that has a microphone you would select that audio source.
3. Click the OK button.
You should ensure that the Audio source is set to the same device as the video source for the best audio recording.
4. Click the Make Default button to save the new audio setting.
NOTE: If you don't click the Make Default button the settings will apply while the Capture Window is open but will revert to default the next time it is open.
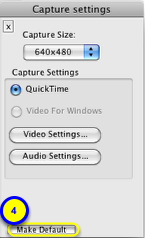
Setting Capture size
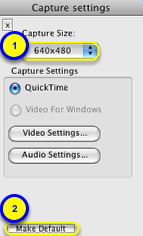
To set the capture size:
1. select the new size from the Capture Size button.
2. Click the Make Default button to save the new audio setting.
NOTE: If you don't click the Make Default button the settings will apply while the Capture Window is open but will revert to default the next time it is open.
Save settings as Default
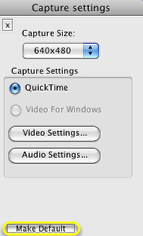
To save any changes to video, audio or capture size settings as the default settings click the Make Default button before closing the Capture settings window.
NOTE: If you don't click the Make Default button the settings will apply while the Capture Window is open but will revert to default the next time it is open.
Close Capture Settings window
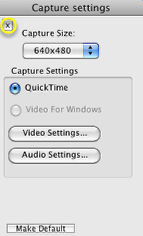
When you have completed making the changes to your settings close the Capture settings window by clicking the X button in the top right hand corner.