Create a New Project: record a target movie using a source movie
You can record a movie of a user interpreting a source movie. You would use this for interpreting a signed language movie into a spoken language or a spoken language into a signed language. The source movie is merged with the target movie after the video is finished.
Open the Project Manager
You have to be in the Project Manager to create a new project. When VideoLinkwell first opens it is in the Project manager. If you are in the Project Browse mode click the 'Back' button to return to the Project Manager.
Create a New project
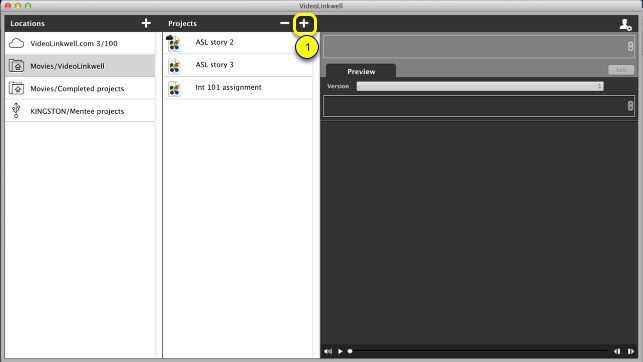
To create a new project.
1. Click the plus '+' button above the Projects list.
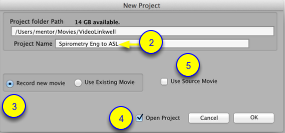
2. Enter the Project Name
3. Click on the Record new movie radio button.
4. (optional) Check the Open Project checkbox.
- if this is checked the project will open in Record Moce immediately for recording.
- if this is not checked the project will not be opened, but when you open it in the future you will switch to Project Record mode to record the project
5. Click the Use Source Movie checkbox.
- this will expand the dialog to show controls to select the source movie and configure how it will be incorporated into the project.
Record using a source movie
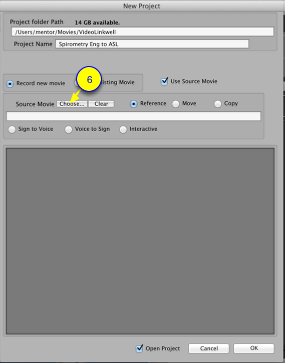
6. Click the Choose... button to choose a source video to intepret.
Select a source movie
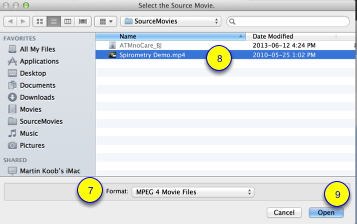
7. Select the format.
- for Quicktime movies with a .mov extension select Quicktime Movie Files
- for Quicktime movies with a .mp4 or .m4v extension select MPEG 4 Movie Files
- the movie must be a .mov, .mp4, .m4v with H.264 encoding to work with VideoLinkwell
In the above image with MPEG 4 Movies format selected the mp4 movie can be selected. See Enable selection of MPEG 4 movies for more details on selecting the movie format.
8. Select the movie you want to interpret.
9. Click the Open button
- when the movie opens there are controls to play it so you can preview it.
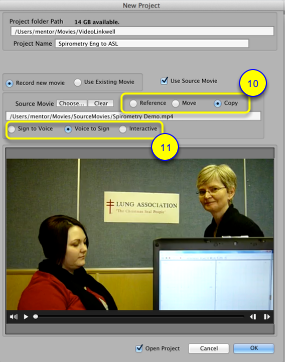
10. Select whether to reference the source movie or to copy or move the source movie to the project folder
- reference - the movie will not be copied to the project folder
(this would be for local projects where you don't need the source movie to be included in the project folder)
- move - the movie will be moved from its current location to the project folder
- copy - the movie will be copied to the project folder and the movie will aslo stay in its original location
( you would move or copy if you want the original source movie to be included in the project folder)
11. Select the direction of the interpretation
- Sign to Voice - this will put the sign langugage video of the source movie and the spoken language audio of the target video into the project's edited target video
- Voice to Sign - this will put the spoken language audio of the source movie and the sign language video of the target video into the project's edited target video
- Interactive - This will include the target video as a picture in picture of the source video. This would be used where the target and source videos have both signed and spoken languages in them.
12. Click the OK button
-This will open the project in Record mode.
Record Mode: Project with source video

In record mode when using a source video the main components are:
1. the Source video player
2. the Video capture window with a preview of the video being recorded
- If you click anywhere outside of this window the preview will be hidden. For more information on configuring Video Capture see Setting up VideoLinkwell Recording
3. the Show video capture window button
- to show the preview click on this button
4. The recording controls
- use these controls to start and pause the recording of the video.
For more details on how to use these while recording see Record with source movie controls
5. (optional) The Cancel recording button.
Cancelling a new project (optional)
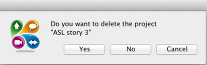
If you click the Cancel button you will get a dialog asking if you want to delete the project
If you click No the recording will be cancelled but the new project will not be deleted. You will return to the project manager. the New project can be opened at a later time to add the recording.
If you click Yes the recording will be cancelled and the new project will be deleted. You will then return to the project manger.
If you click Cancel you can continue recording the project.
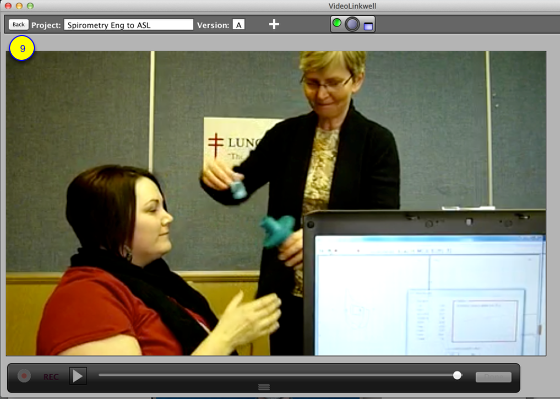
9. Once you have finished recording click the Back button to open the project in browse mode.